Orange Peel Texture Measurement Using 3D Profilometry


The size and frequency of surface structure on a substrate can have an intended or unintended effect on the quality of a coating’s gloss. Orange peel, named after its appearance, can develop from many factors, including substrate, but most commonly is a result of technique. Different texture problems are commonly described by the waviness, wavelength and the visual effects they have on the coating’s gloss. The smallest textures result in gloss reduction, while larger textures can result in visible ripples on the coated surface – such as orange peel. Understanding the development of these textures and their relation to substrates and techniques is critical to quality control.
3D Non-Contact Profilometer
Unlike traditional 2D instruments used to measure texture, 3D non-contact measurement provides a quick 3D image to better visually understand the surface characteristics, and offers the ability to quickly investigate areas of interest. Without speed and 3D review, a quality control environment relies solely on 2D information that gives little overall predictability of the entire surface. Understanding texture in 3D allows for the best selection of processing and control measures. Assuring the quality control of such parameters will rely heavily upon quantifiable, reproducible and reliable inspection. Nanovea 3D non-contact profilometers utilize chromatic confocal technology with the unique capability to measure the steep angles found during faster measurement. The profilometers are designed with leading-edge optical pens using superior white light axial chromatism. Other techniques fail to provide reliable data, due to probe contact, surface variation, angle or reflectivity.
Measurement Objective
In this article, the Nanovea ST400 is used to measure the orange peel result on a paint’s gloss. There is an endless list of surface parameters that can be automatically calculated after the 3D surface scan. Here we will review a 3D surface and select areas of interest to further analyze, including quantifying and investigating the characteristics of orange peel.
Measurement Principle
The axial chromatism technique uses a white light source, where light passes through an objective lens with a high degree of chromatic aberration. The refractive index of the objective lens will vary in relation to the wavelength of the light. In effect, each separate wavelength of the incident white light will re-focus at a different distance from the lens (different height). When the measured sample is within the range of possible heights, a single monochromatic point will be focalized to form the image. Due to the confocal configuration of the system, only the focused wavelength will pass through the spatial filter with high efficiency, thus causing all other wavelengths to be out of focus. The spectral analysis is done using a diffraction grating. This technique deviates each wavelength at a different position, intercepting a line of CCD (charge coupled device), which in turn indicates the position of the maximum intensity and allows direct correspondence to the Z height position (Figure 1). A CCD is a device for the movement of electrical charge, usually from within the device to an area where the charge can be manipulated, for example conversion into a digital value. This is how the measurement numeric data/results are created.
Nanovea optical pens have zero influence from sample reflectivity. Variations require no sample preparation and have the advanced ability to measure high surface angles. They are capable of large Z measurement ranges, and measure any material, including transparent/opaque, specular/diffusive, polished/rough. Measurements in-clude profile dimension, roughness finish texture, shape form topography, flatness warpage planarity, volume area, step-height depth thickness and many others.
Measurement Discussion
Measurements are randomly selected on the coated sample. Small height variation, from nanometers up to 27 mm can easily be measured. There are several options to describe the density and depth of the peaks and valleys. Peak density can be quantified under Sds (EUR 15178N). Another way to look at density would be the autocorrelation length parameter Sal (ISO 25178). The depth of the valleys can be quantified in several ways as well. All values come from the same measurement, but have different parameters of filters, equations, etc. under ISO and many other standards.
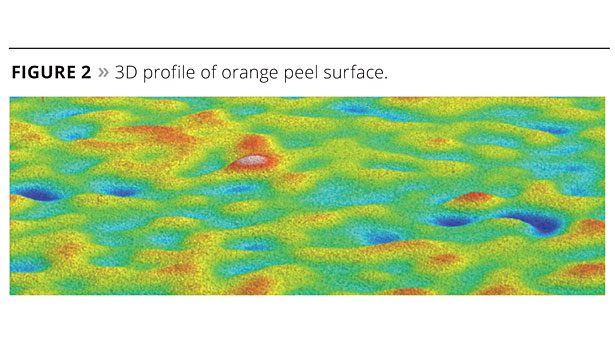
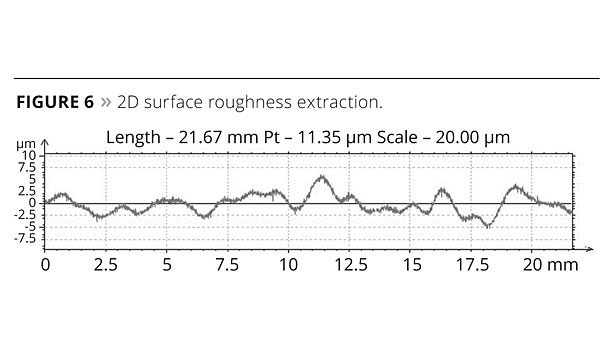
Results of various measurements are shown in Figures 2-7. Results can be given in 3D or 2D. Results shown here in 3D are: Surface profile of the orange peel surface (Figure 2), roughness parameters (Table 1), directional surface mapping (Figure 3) and density of peaks (Figure 4). 2D results shown are: the chosen area of surface extraction (Figure 5) and surface roughness (Figure 6). From 2D extraction, pitch, height, angle, surface area, roughness and many other calculations can be automatically made.
Conclusion
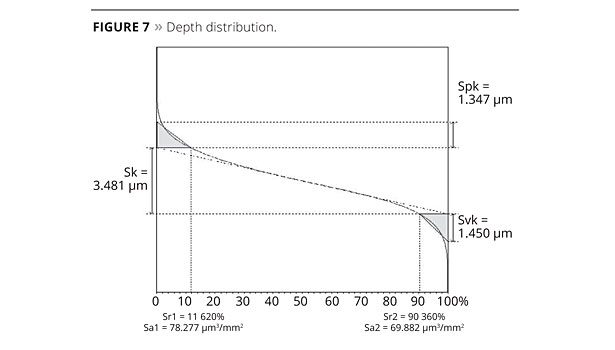
A graphical representation of the depth distribution can also be seen in the bearing ratio curve (Figure 7). This is an interactive feature within the software that allows the user to view distributions and percentages at varying depths.
We have shown how the Nanovea ST400 3D non-contact profilometer can precisely characterize both the topography and the nanometer details of the orange peel texture of a gloss coating. From the 3D surface measurements, areas of interest can quickly be identified and then analyzed with a list of endless measurements (dimension, roughness finish texture, shape form topography, flatness warpage planarity, volume area, step-height and others). A 2D cross-section can quickly be chosen to analyze further details. With this information, gloss texture can be broadly investigated with a complete set of surface measurement resources. Special areas of interest could have been further analyzed with an integrated AFM module. Nanovea 3D profilometer speeds range from 20 mm/s to 1 m/s for laboratory or research high-speed inspection. The unitscan be built with custom size, speeds, scanning capabilities, Class 1 Clean Room compliance, with Indexing Conveyor and for inline or online integration.
Looking for a reprint of this article?
From high-res PDFs to custom plaques, order your copy today!


