Good Thickness Vibrations: Ultrasonic Coating Thickness Measurement
Conventional coating thickness tests are time-consuming, difficult to perform, and are subject to operator interpretation and other measurement errors. Applicators find destructive methods impractical. To get a statistically representative sample, several wood or plastic products from a lot might need to be scrapped as part of the destructive testing process. With the arrival of advanced ultrasonic instruments, many finishers have switched to nondestructive inspection using this accurate measurement technique.
Coatings are designed to perform their intended function best when they are applied within the tight thickness range specified by the manufacturer. For example, conversion varnishes used on wood are harder than other coatings and should not be used in excess of 5 mils dry thickness in order to prevent cracking or other finish failures. Nitrocellulose lacquer usually should be kept lower than 3 mils. A consistent mil thickness is paramount when applying lacquer basecoats and crack coats to achieve a desired crackle finishing effect.
On medium density fiberboard (MDF), powder coating thickness typically ranges between 3 and 9 mils. Usually, the thicker the mil coverage, the more durable the finish. Factory specifications often call for a stated ±1 mil tolerance. This level of quality cannot be determined just by looking at the coating; instead, it must be measured with precise instruments.
There are other benefits to measuring the finish thickness precisely. When companies check and verify the coating quality of incoming material, they avoid wasting money reworking product. By checking the spray operators’ technique, they ensure that the coating is being applied in compliance with the manufacturers’ recommendations. Additionally, applying the right film thickness can ensure a high level of overall efficiency. Finally, regular testing can reduce the number of customer returns due to finishing defects.
Over metal, the coating thickness commonly is measured for quality control and inspection purposes. When the base metal is carbon steel, a magnetic method is used. Eddy current devices are used for other metals, such as copper and aluminum. However, since these instruments can’t measure the thickness of finishes over wood or plastics, alternate techniques have been used, including:
With the arrival of advanced ultrasonic instruments, many finishers have switched to nondestructive inspection using this accurate measurement technique.

Wall-thickness measurement is perhaps the most common and simple of ultrasonic tests. Precision ultrasonic wall-thickness gages permit quick thickness measurement of objects without requiring access to both sides. For coating measurement, however, these gages are not ideal. They do not have sufficient sensitivity to measure the thickness of acrylic fillers, factory primers, lacquers, ultraviolet (UV) finishes, powder coatings and other materials used over wood and plastics.
The first handheld instruments designed specifically for coating thickness measurement appeared on the market 14 years ago. Modern versions of these instruments use a single-element transducer and advanced numerical techniques to filter and enhance digitized echoes, making the instruments even more accurate and reliable (see Figure 1).

Because a potentially large number of echoes could occur, the ultrasonic measurement gage is designed to select the maximum or “loudest” echo from which to calculate a thickness measurement. Instruments that measure individual layers in a multilayer application also favor the loudest echoes. The user simply enters the number of layers to measure, say three, and the gage measures the three loudest echoes. The gage ignores softer echoes from coating imperfections and substrate layers.

From a practical standpoint, sound velocity values do not vary greatly among the coating materials used in the wood or plastics industries. Therefore, ultrasonic coating thickness gages usually require no adjustment to factory calibration settings.
However, one factor that does influence the accuracy and repeatability of ultrasonic measurement is how these coatings interface with the substrate. Figure 3 shows two examples of coated wood. These photos, taken at higher resolution than most field destructive tests are capable of, clearly show the boundary between the finish and the wood. The finish may look smooth on top, but the thickness might be inconsistent. Wood substrates often are grainy with varying degrees of surface roughness and primer penetration. Such porosity and roughness may promote adhesion, but they increase the difficulty of attaining repeatable thickness measurements by any means.
Ultrasonic gages are designed to average small irregularities to produce a meaningful result. On particularly rough surfaces or substrates where individual readings may not seem repeatable, comparing a series of averaged results often provides acceptable repeatability (see Figure 4).
Musical instrument manufacturers now use ultrasonic gages to measure the lacquer accurately and nondestructively on their valuable products. As a result of using this new technology, they have not only decreased their lacquer usage, but they are able to take meaningful measurements without excessively disrupting their production process. There’s no need to scrap product to measure a coating thickness, and the thickness over the entire surface can easily be measured to ensure a smooth, even coating. Rework is minimized due to an increased ability to control the coating process.

Manufacturers and applicators alike have long believed that there is no simple and reliable means for non-destructively measuring coatings on plastic substrates. Their common solution was to place metal (steel or aluminum) coupons next to the part and then measure the thickness applied to the coupon with either a mechanical or electronic (magnetic or eddy current) gage. This labor-intensive solution is based on the (usually inaccurate) assumption that a flat coupon placed in the general coating area receives the same paint profile as the plastic part in question.
An ultrasonic solution enables the user to measure the total coating thickness of the actual part, as well as to identify multiple distinct layers,* thereby ensuring a higher level of accuracy and a better finish quality.
Quick, nondestructive thickness measurements can now be taken on materials that previously required destructive testing or lab analysis. This new technology improves consistency and throughput in the finishing room. Potential cost reductions include:
For more information about ultrasonic coating thickness measurement, visit www.defelsko.com.
*Paint application processes such as wet-on-wet may not provide a sufficient boundary interface between layers for the ultrasonic gage to pick up the reflective signal. Also, to identify the thickness of an individual layer, coatings applied greater than 25 microns (1 mil) provide the best measurement results.

Modern ultrasonic coating thickness measurement instruments are simple to operate, affordable and reliable.
Coatings are designed to perform their intended function best when they are applied within the tight thickness range specified by the manufacturer. For example, conversion varnishes used on wood are harder than other coatings and should not be used in excess of 5 mils dry thickness in order to prevent cracking or other finish failures. Nitrocellulose lacquer usually should be kept lower than 3 mils. A consistent mil thickness is paramount when applying lacquer basecoats and crack coats to achieve a desired crackle finishing effect.
On medium density fiberboard (MDF), powder coating thickness typically ranges between 3 and 9 mils. Usually, the thicker the mil coverage, the more durable the finish. Factory specifications often call for a stated ±1 mil tolerance. This level of quality cannot be determined just by looking at the coating; instead, it must be measured with precise instruments.
There are other benefits to measuring the finish thickness precisely. When companies check and verify the coating quality of incoming material, they avoid wasting money reworking product. By checking the spray operators’ technique, they ensure that the coating is being applied in compliance with the manufacturers’ recommendations. Additionally, applying the right film thickness can ensure a high level of overall efficiency. Finally, regular testing can reduce the number of customer returns due to finishing defects.
Over metal, the coating thickness commonly is measured for quality control and inspection purposes. When the base metal is carbon steel, a magnetic method is used. Eddy current devices are used for other metals, such as copper and aluminum. However, since these instruments can’t measure the thickness of finishes over wood or plastics, alternate techniques have been used, including:
- Optical cross-sectioning (cutting the coated part and viewing the cut microscopically)
- Height measurement (measuring before and after with a micrometer)
- Gravimetric measurement (measuring the mass and area of the coating to calculate thickness)
- Dipping wet film thickness gages into wet paint and calculating dry-film thickness using the percent of solids by volume
- Substitution (placing a steel coupon alongside the wood or plastic part and coating it at the same time)
With the arrival of advanced ultrasonic instruments, many finishers have switched to nondestructive inspection using this accurate measurement technique.

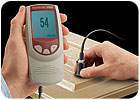
Figure 1. The PosiTector 200 ultrasonic coating thickness gage.
Ultrasonic Breakthrough
Quality professionals are already familiar with various aspects of ultrasonic testing, in which high-frequency sound energy is used to conduct examinations and make measurements. Ultrasonic testing can detect and evaluate flaws in metal, measure dimensions, ascertain material characterization and accomplish other measurement tasks.Wall-thickness measurement is perhaps the most common and simple of ultrasonic tests. Precision ultrasonic wall-thickness gages permit quick thickness measurement of objects without requiring access to both sides. For coating measurement, however, these gages are not ideal. They do not have sufficient sensitivity to measure the thickness of acrylic fillers, factory primers, lacquers, ultraviolet (UV) finishes, powder coatings and other materials used over wood and plastics.
The first handheld instruments designed specifically for coating thickness measurement appeared on the market 14 years ago. Modern versions of these instruments use a single-element transducer and advanced numerical techniques to filter and enhance digitized echoes, making the instruments even more accurate and reliable (see Figure 1).

Figure 2. Ultrasonic vibrations reflect off coating interfaces.
A Sound Measurement Technique
Ultrasonic coating thickness measurement works by sending an ultrasonic vibration into a coating using a probe (transducer) with the assistance of a couplant applied to the surface. The vibration travels through the coating until it encounters a material with different mechanical properties -typically the substrate but perhaps a different coating layer. The vibration, partially reflected at this interface, travels back to the transducer. Meanwhile, a portion of the transmitted vibration continues to travel beyond that interface and experiences further reflections at any material interfaces it encounters (see Figure 2).Because a potentially large number of echoes could occur, the ultrasonic measurement gage is designed to select the maximum or “loudest” echo from which to calculate a thickness measurement. Instruments that measure individual layers in a multilayer application also favor the loudest echoes. The user simply enters the number of layers to measure, say three, and the gage measures the three loudest echoes. The gage ignores softer echoes from coating imperfections and substrate layers.

Figure 3. Two examples of uneven coating/substrate regions.
Measurement Accuracy
The accuracy of any ultrasonic measurement directly corresponds to the sound velocity of the finish being measured. Because ultrasonic instruments measure the transit time of an ultrasonic pulse, they must be calibrated for the “speed of sound” in that particular material.From a practical standpoint, sound velocity values do not vary greatly among the coating materials used in the wood or plastics industries. Therefore, ultrasonic coating thickness gages usually require no adjustment to factory calibration settings.
However, one factor that does influence the accuracy and repeatability of ultrasonic measurement is how these coatings interface with the substrate. Figure 3 shows two examples of coated wood. These photos, taken at higher resolution than most field destructive tests are capable of, clearly show the boundary between the finish and the wood. The finish may look smooth on top, but the thickness might be inconsistent. Wood substrates often are grainy with varying degrees of surface roughness and primer penetration. Such porosity and roughness may promote adhesion, but they increase the difficulty of attaining repeatable thickness measurements by any means.
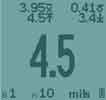
Ultrasonic gages are designed to average small irregularities to produce a meaningful result. On particularly rough surfaces or substrates where individual readings may not seem repeatable, comparing a series of averaged results often provides acceptable repeatability (see Figure 4).

Figure 4. Some instruments provide statistical analysis. In this example, 10 measurements have been taken. The last measurement of 4.5 mils is displayed along with the average, standard deviation and maximum/minimum values of all 10 readings.
Ensuring the Right Sound
Ultrasonic testing brings distinct benefits to the wood industry. Wood furniture, flooring and musical instrument manufacturers often apply several layers of lacquer or similar finishing materials. Some processes require the ability to identify the thickness of individual layers or series of layers. When applied at the wrong thickness, the coating layer that beautifies and protects a high-quality guitar, for example, can easily detract from its sound. Too much coating can dampen the guitar’s acoustic resonance; too little can have the reverse effect.Musical instrument manufacturers now use ultrasonic gages to measure the lacquer accurately and nondestructively on their valuable products. As a result of using this new technology, they have not only decreased their lacquer usage, but they are able to take meaningful measurements without excessively disrupting their production process. There’s no need to scrap product to measure a coating thickness, and the thickness over the entire surface can easily be measured to ensure a smooth, even coating. Rework is minimized due to an increased ability to control the coating process.

Figure 5. Some instruments measure the individual layers in a multilayer system. In this example, layer 1 is 4.1 mils thick, layer 2 is 1.4 mils thick, layer 3 is 1.8 mils thick, and the total thickness is 7.3 mils. The graphical LCD displays three “peaks” representing three material interfaces.
Measuring in Layers
The ability of ultrasonic coating thickness instruments to measure individual layers in a multilayer coating application is particularly useful in the coating of plastics (see Figure 5). For example, finishes on automotive plastics involve applying several coating layers to attain full aesthetic appearance and protective properties.Manufacturers and applicators alike have long believed that there is no simple and reliable means for non-destructively measuring coatings on plastic substrates. Their common solution was to place metal (steel or aluminum) coupons next to the part and then measure the thickness applied to the coupon with either a mechanical or electronic (magnetic or eddy current) gage. This labor-intensive solution is based on the (usually inaccurate) assumption that a flat coupon placed in the general coating area receives the same paint profile as the plastic part in question.
An ultrasonic solution enables the user to measure the total coating thickness of the actual part, as well as to identify multiple distinct layers,* thereby ensuring a higher level of accuracy and a better finish quality.
A Final Echo
Ultrasonic coating thickness measurement is now an accepted and reliable testing routine used in the wood and plastics industries. The standard test method is described in ASTM D6132-04, “Standard Test Method for Nondestructive Measurement of Dry Film Thickness of Applied Organic Coatings Using an Ultrasonic Gage” (2004, ASTM). To verify gage calibration, epoxy coated thickness standards are available with certification traceable to national standards organizations.Quick, nondestructive thickness measurements can now be taken on materials that previously required destructive testing or lab analysis. This new technology improves consistency and throughput in the finishing room. Potential cost reductions include:
- Minimizing waste from over-coating by controlling the thickness of the coating being applied
- Minimizing rework and repair through direct feedback to the operator and improved process control
- Eliminating the need to destroy or repair objects by taking destructive coating thickness measurements
For more information about ultrasonic coating thickness measurement, visit www.defelsko.com.
*Paint application processes such as wet-on-wet may not provide a sufficient boundary interface between layers for the ultrasonic gage to pick up the reflective signal. Also, to identify the thickness of an individual layer, coatings applied greater than 25 microns (1 mil) provide the best measurement results.
Looking for a reprint of this article?
From high-res PDFs to custom plaques, order your copy today!


