Temperature Profiling is Heating Up
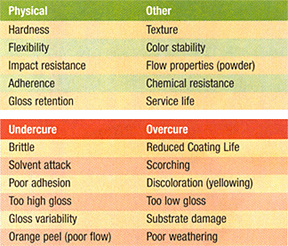
Coating Properties Critically Affected by the Cure Schedule
Table 2 (bottom)
Effects of Using the Incorrect Cure Schedule on Coating Quality
A thermal-cure process is affected by the temperature, the time-at-temperature or, in some cases, the rate of temperature change. The coating film properties listed in Table 1 are all controlled by the cure process and are therefore temperature-critical.
If the cure process is not controlled, it is possible that the coating may be under- or overcured, and the quality of the coating may be compromised, as detailed in Table 2.
In most cases, the physical testing of the coating is done after the cure cycle has been completed. This approach is time-consuming and highlights problems only after the damage is done. Physical tests such as differential scanning colorimetry (DSC), chemical rub testing, and impact and gloss measurement may give some feel for the potential cause of cure problems, but they often don’t provide sufficient information to allow rapid, accurate corrective action.
To guarantee finish quality, it is necessary to obtain accurate and specific
knowledge of the temperatures experienced by a coated product throughout the
entire curing process. Each and every coating has a specific cure schedule
with specific time and temperature values.
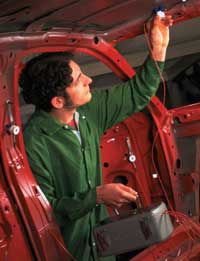
The critical temperature in the cure schedule is a measurement of the part temperature, not the air temperature or oven setting. The thermal mass of the part affects the bring-up time of the part. At a fixed oven temperature an item of low thermal mass (16-gauge steel) will reach the cure temperature significantly faster than an item of higher thermal mass (half-inch steel). Other parameters that will affect the heating rate of a component include the following:
- Oven starting temperature
- Temperature drop in a batch oven when the door is opened for loading
- Oven temperature recovery rate
- Substrate material
- Oven design (IR, convection)
- Thermal uniformity in oven
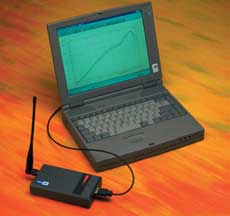
In order to confirm that the part has reached the necessary temperature and time for full cure, it is important to
measure the behaviour of the part throughout the cure cycle. The only means of obtaining such information is to
employ in-process temperature profiling, as shown in the picture (left).
Temperature profiling benefits
With the advanced information provided by profiling systems, the level of information and analysis capability now available is much broader than coating quality assurance. Information provided is now helping to improve operating efficiency and understanding and control of the thermal-cure processes.
- Quality assurance—Confirm that all products achieve the required cure schedule to guarantee coating quality. If
problems occur that may affect quality, they can be identified immediately.
- Process control—Prove that the cure process is being performed in a controlled, repeatable fashion day after
day. Utilizing statistical process control (SPC), identify possible future problems allowing proactive preventive
action.
- Process optimization—Obtain profile information necessary for developing new cure processes accurately and
efficiently.
- Improved productivity—Eliminate rejects or rework and maximize product throughput while minimizing scrap
costs.
- Improved efficiency—Use profile data to understand and optimize the operating characteristics of any cure
process, possibly providing an increase in line speed and product throughput or reduced operating costs
(labor/fuel).
- Problem solving—When problems occur, identify the cause and location of the problem promptly. Use the profile
information to suggest necessary corrective action and prove the value of such action with follow-up profile runs.
- Process standardization and documentation—Archive fully traceable and certified temperature-profile data and create hard-copy reports to prove to management, customers, coating suppliers or other regulatory bodies that your process complies with formal operating standards.
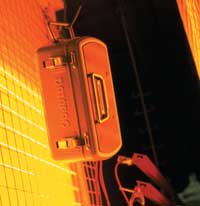
Profiling methodology
To obtain meaningful and accurate data, it is essential that careful consideration is paid to the way in which the profile run is performed.Direct profiling utilizes temperature measurements that are taken directly from a standard coated product as it passes through the normal production cure process. Direct profiling is generally performed where it would be too expensive to use a test piece and where thermocouples can be quickly and consistently applied to the product on a conveyor without causing damage to the surface coating.
Indirect profiling utilizes temperature measurements taken from a test piece designed to imitate a standard coated product. The test piece is inserted during the normal production run and is used repeatedly for profiling.
Indirect profiling is performed where direct attachment of probes would cause coating damage and incur expensive scrap. Test pieces are generally employed where a standard product line makes it possible to use one test piece.
It is essential that the test piece be properly designed to mimic normal production items for accurate indirect profiling. Critical considerations required when designing and using a test piece include:
- Material
- Thermal mass (product/thermocouple)
- Surface coating/heating technology
- Geometry
- Orientation
- Oven loading
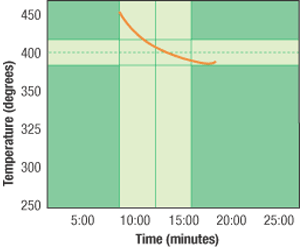
Cure Index–Theoretically Equivalent Cure Schedules
Real-time temperature profiling
One of the most significant technological breakthroughs with temperature profiling in recent years has been the introduction of real-time monitoring capability.Radio telemetry now allows data to be recorded by the data logger as it travels through the oven and transmitted directly to a receiver connected to the PC running the profiling system’s operating software. Product and oven temperature can be viewed and analyzed in real-time while the product is in the oven. The obvious benefit of this capability is instant adjustment without waiting to download the results after the data logger exits the oven.
Real-time monitoring has a number of benefits, allowing users to:
- Compare real-time data with predefined process and cure
criteria before the system has even left the oven.
- Repeat profile runs without having to open the thermal
barrier or even download data.
- Identify the exact moment the cure criteria, such as
time-at-temperature, is achieved.
- See immediately when problems occur and use the
information to correct them.
- Use live data to speed up oven optimization/balancing by
viewing the effect of parameter changes instantaneously.
For a full and accurate calculation of cure conditions, it is essential to include the whole profile, including each and every time-at-temperature contribution. This can then be used in the index-of-cure calculation.
An index-of-cure is used to quantify the degree of cure for a specific
coating and thermal process. The cure index is derived from the fact that
every coating has a specified cure schedule, achieving optimum cure at
defined temperature/time profiles, as illustrated in Figure 1. Use of the
index-of-cure allows immediate identification of the quality of cure of any
product, irrespective of its shape, thermal mass or orientation within the
oven.
Temperature profile data can then be analyzed with the system software to evaluate and quantify the index of cure in the following fashion:
- Index of cure 100—perfect cure
- Index of cure < 100—undercure
- Index of cure > 100—overcure
For example, the use of IR heating may provide acceptable
index-of-cure values in the range of 60 to 80 due to the rapid
crosslinking associated with light-energy exposure. Once an
acceptable index-of-cure tolerance band is established, it can be
monitored and maintained as part of QA statistical process control.
Changing times
To control a process, it is essential that regular testing be performed. QA managers are often busy with other tasks and shop workers are responsible for collecting temperature-profile data. Data-collection systems must be simple to use, but they must provide detailed analysis and meaningful profiles. Software customization is a way in which a single, standard software package can be set up to provide the functionality required by the individual using it.The software operation can be simplified to a minimal number of buttons, making profiling easy and efficient. If the operation is simple and quick, operators will be able to perform the task and provide accurate and valuable data. The data can be stored for later use by the QA manager, using the same software package but logging on at a higher user level.
Regular collection of profile data provides a better understanding of how the oven or process changes over time. Profiling daily makes it possible to use SPC procedures and apply index of cure as a process performance indicator.
Monitoring trends with profiling software may identify slow deterioration in process performance. Identifying
problems early enough allows corrective action to be implemented at a convenient time and before a crisis
situation is reached that may require immediate line shutdown and the resulting lost production/profit.
Pocket power
Coating suppliers rely on oven profiling to help them troubleshoot cure issues. The oven profiling system allows a quick profile of the cure oven to be obtained and then compared against the coating manufacturer’s own cure schedule specifications to confirm adequate cure or highlight problem areas.A cold spot in the oven may be due to faulty components in the burner box, such as a recirculating fan that is out of balance or a duct system that is blocked by a filter. Cure problems may simply be caused by oven settings that are incorrect for the product being coated or by poor calibration between the controller and the thermocouple.
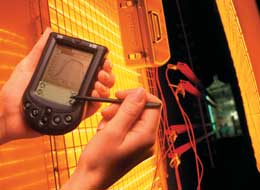
Portable profile systems have been developed specifically for coating companies or anybody having to travel between oven profiles. The temperature profiling system now can be carried in a bag no bigger than a laptop and doesn’t even require a PC or laptop for operation. These lightweight, compact systems provide all the power of a normal profile system at a fraction of the normal weight and size.
At the heart of the system is a profile-analysis software system that runs on a PDA. Complete with data logger, thermal barrier and thermocouples, the whole system fits into a compact and portable carry bag, making it an ideal solution for oven monitoring on the move.
With the new portable unit, it is possible to view full profile graphics on screen with zooming capability. This task can be performed at the exit of the oven, if necessary, as soon as the oven profile system is retrieved.
To provide traceable documentary proof of the profile results, it is possible to generate a single-page report from the PDA utilizing the IRDA printer interface. Without any need for bulky interface cables, the data can be sent directly to a portable printer via the PDA’s IR beam facility.
Multiple profile runs can be collected with the data storage facility of the PDA. While travelling, the paint sales/service manager can store all the profile runs he needs as he visits consecutive customers. If necessary, these files can later be transferred back to a PC with full PC software for more comprehensive analysis and archiving of customer files. This is particularly important for audit purposes that require comprehensive standard reports that can incorporate profile graphics and analysis data information with other QA results.
As is often the case, the best products are the simplest products. The hand-held palm device is simple to use, providing the necessary information with the tap of a stylus and allowing direct operation of standard loggers without the expense of additional PC equipment.
Temperature profiling, now widely used in the finishing industry, has come a long way from the simple beginnings of a basic chart recorder temperature trace.
Temperature profiling has many benefits beyond simple QA testing. It provides in-depth analysis and control of the cure process. Through regular use, collected profile data can be used proactively to highlight potential future problems before they become critical, saving time, effort and money. Development in both software and hardware allows accurate profile data to be routinely collected by those working on the shop floor with all the traceability and certification necessary of quality standards such as ISO/QS9000.
With the introduction of the new portable systems running on palm PDA units, the task of oven profiling has been made even easier. For the first time, coating suppliers can now travel from customer to customer, with everything they need to run the unit stored in their top pockets, to verify oven cure conditions.
Looking for a reprint of this article?
From high-res PDFs to custom plaques, order your copy today!


