How to Use Touch-Up Paint For Flawless Fixes

Hook marks, also known as shielding or the robbing effect, can be hard to avoid. As parts are put on hangers to be coated, a portion of the hanger can be located in between the coating equipment and the part. This space leads to bare spots (hook marks) or lightly covered areas. Inside corners, drawer handle indents on filing cabinets, and other recessed areas pose another challenge to coating. The more narrow and deep the recessed area is, the harder it is to coat. Manually applied touch-up paint, matched to the exact color of the product, can cover these marks and recessed areas. Touch-up paint also can be used to cover nicks, chips and imperfections caused by installation or assembly.
Touch-up paint can be applied in one of three ways: aerosol, brush-in-cap bottles or paint pens. Each type has an appropriate application situation. Aerosols are good for larger blemishes and recessed areas, while brush-in-cap bottles and paint pens are ideal for small nicks or scratches. Before purchasing touch-up paint, carefully review the area to be covered and then decide on which application method you need.
Once you have your touch-up paint and it is matched exactly to the product's coating, what do you do? Do you just start spraying or applying paint from the bottle? No. There are certain "how-to" steps that should be followed. Use the following information to help you utilize your touch-up paint for the best results.

Before You Begin
Make sure the surface is clean, dry and free of grease and oil. If needed, use a mild solvent and a clean cloth to wipe down the surface. Glossy surfaces should be dulled using a medium to fine grit sand paper. This will ensure proper adhesion of the touch-up paint.If using an aerosol to touch up a smaller area, it is a good idea to mask any areas where touch-up paint is undesirable. Masking tape, paper or plastic sheeting can be used. Another great masking material is aluminum foil. It can be pressed into place to create an impermeable barrier. It also is important to remember that touch-up paint is meant to cover small nicks and scratches only. It is not meant for large areas or deep gouges.
If you are still uncertain about your chosen touch-up process, it is always best to test it on a scrap part or in an inconspicuous area to determine if the results will be acceptable.
Aerosol Touch-Up Paint
Always shake an aerosol can for at least 1 min after the mixing balls begin to rattle. If the mixing balls are not rolling freely, turn the can upside down and tap the bottom of the can with the palm of your hand to free them. It is possible that the color and gloss of the paint will change if the paint is not shaken properly.When spraying, always hold the can upright, 10 to 12" from the surface. For best results, spray with even misting passes. When a smooth, continuous film has been achieved, the paint will have a wet look. Allow the paint to dry 5 min and then continue. Shake the can periodically between coats.
When you are finished, prepare the can for storage. Hold the aerosol can upside down and spray until you see a white gas (2 to 3 sec). This will clear the valve and prevent paint from drying in the spray tip.
Brush-On Touch-Up Paint
Making sure that the product is capped tightly, always shake the bottle for at least 1 min after the mixing balls begin to rattle. Dip the brush into the bottle as far as it will go and slowly remove the brush from the bottle. Brush the paint on with smooth strokes and use very light pressure when touching the brush to the surface. Avoid retouching the wet paint film with the brush after it is applied. Do not retouch paint after paint has set up for more than 2 min. When finished, recap the bottle.Paint Pen Application
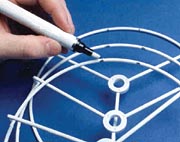
Always shake the paint pen for at least 1 min after the mixing ball begins to rattle. Make sure that the pen is tightly capped before shaking. To use the pen for the first time, remove the cap and prime the tip with paint by pressing it a few times against an inconspicuous horizontal flat surface. Paint will begin to flow through and around the tip. However, pressing the tip continuously may result in too much paint being dispensed. The tip should be pressed only when additional paint is required to cover the area.
Press the tip against the area to be repaired and apply paint with smooth strokes. Avoid retouching the wet paint film with the pen after it is applied. Do not try to retouch after paint has set up for more than 2 min. When finished, recap the pen. If the pen is left uncapped or not tightly capped, the tip will dry out. If this occurs, dip the tip in thinner. If this does not work, you need to replace the tip.
General Troubleshooting
If your touch-up paint does not have the desired effect on your product, then something went wrong. Use the following as a guide for general troubleshooting.Color does not match: The aerosol, bottle or pen was not shaken enough. The pigments inside must be thoroughly mixed to achieve the proper color and gloss. Your product coating may have changed. It may be possible that your original coating has shifted in color.
Color appears flat or hazy: Humid conditions may exist. You will need to apply it under less humid conditions. The surface you are touching up may be too hot. Remove the object from direct sunlight or heat and allow surface to cool.
Surface appears streaky: The thickness of the paint film is uneven. Apply an additional coat of paint and try to get it as smooth and uniform as possible. For aerosols, the application passes have been made in the same direction. Try to vary the spray pattern.
Paint appears saggy or has runs: Too much paint was applied. Apply lighter coats of paint. If you are using aerosols, apply lighter coats by increasing the speed of your hand motion as you spray. The temperature of the paint or substrate may be too low. Allow paint and substrate to warm to room temperature.
You need to remember that touch-up paint does not perform exactly like the original coating. Some fading may happen over time, depending on if the product is used indoors or outdoors and in what weather conditions the product is placed. If exterior durability is an issue, an extended durability touch-up paint that is specially formulated for exterior applications may be what you need. Raabe Corp.'s testing shows that its Precision Color Premium touch-up paint retains its color and gloss for one-and-a-half to two times longer when exposed to identical conditions.
Obtaining the right color and gloss from your touch-up paint is achieved by closely following the application instructions. Air-dry, exact match touch-up paint is an easy way to remove imperfections after the coating process, but applying touch-up satisfactorily is a skill that does require some practice.
Looking for a reprint of this article?
From high-res PDFs to custom plaques, order your copy today!


