Choosing the Right Spectrophotometer


Color matters in the coatings world, particularly for branded products and products sold based on visual appeal in both retail and industrial/commercial environments. Ensuring color consistency throughout the coatings supply chain can present significant challenges. This is especially true in a global and distributed environment where component parts of a single final product, such as an automobile, may be manufactured in disparate locations but must come together as an integral whole at the point of assembly.
Ensuring a color match can also be complex in the retail environment, where busy operators must quickly match paint to customer specifications, often provided via a wide variety of sample types and sizes, as well as from standard paint chips. In addition, there is growing demand both in retail and in industrial/commercial applications for specialty coatings, including reflective, metallic, flake, pearlescent and textured materials that present their own color measurement challenges.
By thoroughly evaluating available measurement options, stakeholders can better select the appropriate solution(s) to ensure accurate, consistent color throughout the color supply chain.
There are three primary types of spectrophotometers used in commercial, retail and industrial applications in the coatings and related industries: traditional 0°/45° (or 45°/0°) spectrophotometers, sphere (or diffuse/8°) spectrophotometers and multi-angle (MA) spectrophotometers. Industry professionals need to understand the difference between these spectrophotometers and their use in various paint applications.
Spectrophotometer Nomenclature
MA spectrophotometers are best suited for measurement of industrial production applications involving special-effect surfaces, such as automotive coatings, metallic or pearlescent inks or coatings, and cosmetics. These are typically used in the lab, on the production line, in QC operations and in the shipping area. MA spectrophotometers are quite complex and require users to verify five or more sets of L*a*b* values or dE* values. They typically have an aperture size of 12 mm, which is too large for measuring fine detail that occurs in many smaller-scale industrial applications. Primary illumination is provided at a 45° angle. Some models have secondary illumination at a 15° angle.
An application example for a MA spectrophotometer lies in the use of non-contact multi-angle spectrophotometers for collecting colorimetric data on special-effect coatings in the automotive industry, thus capturing reliable color data in cases where special-effect coatings are used.
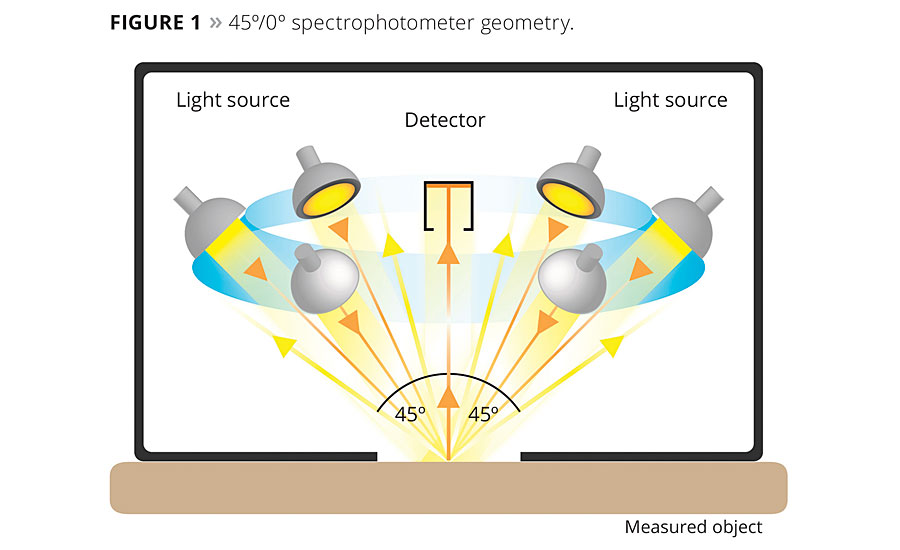
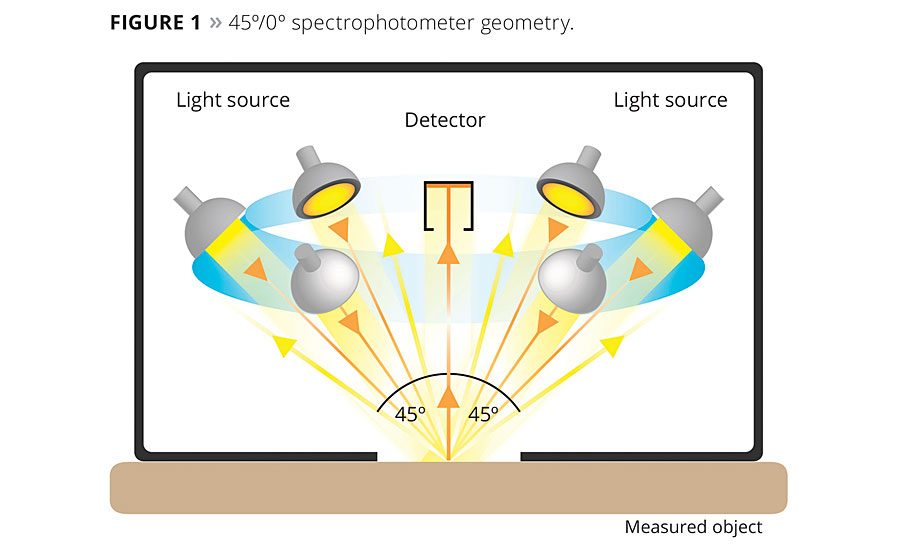
In the case of 45°/0° spectrophotometers, the first number refers to the angle of illumination and the second number refers to the viewing angle. With a 45°/0° spectrophotometer, the light source shines at 45° from the perpendicular of the sample being measured, and the detector receives reflected light at a 0° angle, or perpendicular to the surface of the object. The X-rite eXact is an example of a 45°/0 spectrophotometer. Figure 1 shows the geometry associated with 45°/0 spectrophotometers.
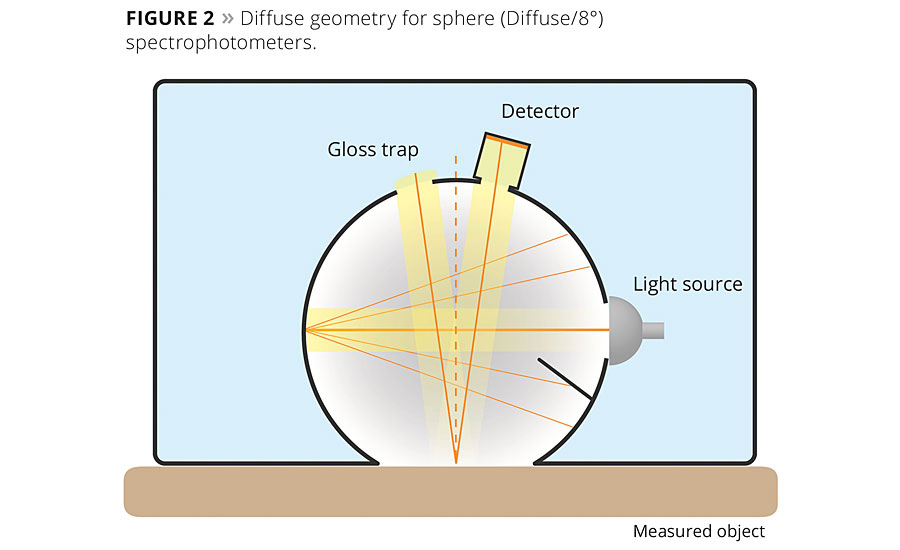
With a sphere (or diffuse/8°) spectrophotometer, the object to be measured is illuminated diffusely, or from all directions, and the detector receives the reflected light at an 8° angle from the surface of the measured object. This is known as “sphere geometry” because these instruments contain a sphere providing diffuse illumination.
In a sphere spectrophotometer such as the X-Rite Ci64 or new Ci7800 for industrial use, the inside of the sphere is lined with a highly reflective, low-gloss, matte white substance used to project and diffuse the light, making it a near perfect white reflector. As the light beam strikes a point on the surface of the sphere, more than 99% of the light is reflected. At the same time, the matte finish of the sphere causes the light to be scattered randomly in all directions. This happens at every point on the surface and effectively causes light inside the sphere to seem to come from every direction at once: the inside of the sphere thus becomes the light source.
Figure 2 is a depiction of how a sphere spectrophotometer operates. In order for a sphere spectrophotometer to function effectively, it must be in full contact with the surface to be measured in such a manner that light does not escape.
Sphere Spectrophotometer
For most industrial/retail applications in the coatings industry, a sphere spectrophotometer offers the best results. Especially important in coatings, users have the choice of including or excluding the gloss component of the surface being measured. In technical terms, this is called “specular included” (SPIN) or “specular excluded” (SPEX). This adds a level of flexibility to these devices not present in other types of spectrophotometers.
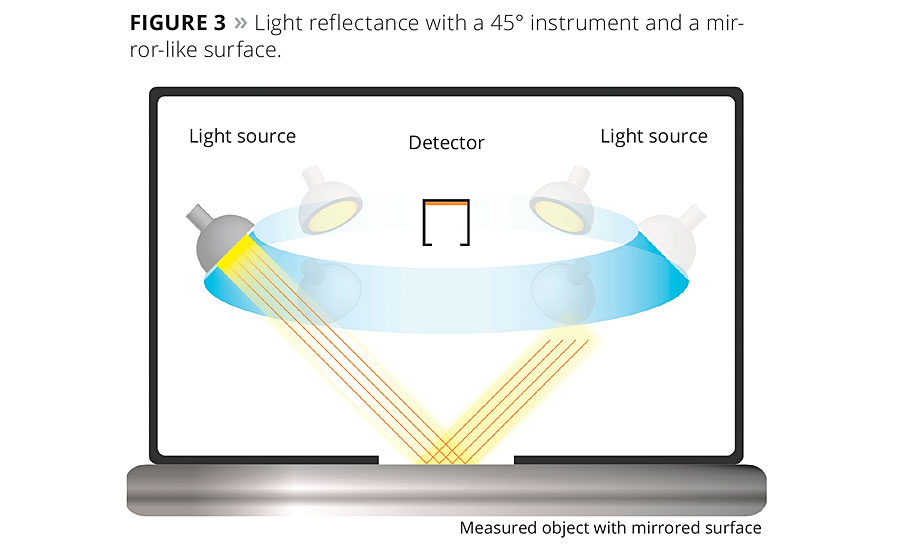
When measuring any mirror-like surface, a 45°/0° instrument will essentially be blind to the surface being measured, since almost 100% of the light will be reflected away from the direction of the sensor, leaving almost none of the light available to be measured by it. The instrument would “see” less light, interpret this as black and would likely yield values that represent the sample color as darker and more saturated than it really is. Measurement of a mirror-like surface with a 45°/0 instrument is depicted in Figure 3.
A 45°/0° spectrophotometer is only capable of specular excluded measurements, and that will affect the accuracy of measurements on shiny surfaces. A sphere spectrophotometer can include the specular reflectance and the diffuse reflectance, delivering a total reflectance measurement and thus an accurate color measurement for colors printed on shiny or mirror-like surfaces. The primary reason to use a sphere-based instrument to measure in SPIN or SPEX mode is for the flexibility of measuring a sample independent of its gloss and surface texture or dependent on it.
Anyone wanting to recreate the material of which an object is made may not want to consider the final object’s surface and gloss level in the first place, which requires surface-independent measurement or SPIN mode. If it is desired to match the visual perception, the object should be measured in SPEX mode in order to see the impact of gloss and surface reflected in the measurement results. Instruments are available that can measure both gloss and color in a single measure process for ultimate efficiency.
Highly reflective or mirror-like surfaces are an exception in that they require the bright surrounding of the sphere in SPIN mode to generate measurements that are closer to reality. An example follows.
Consider a mirror on a table in a dark room. Light is projected onto the mirror at a 45° angle from the perpendicular and you look onto that mirror from 0°, or perpendicular to the surface. Given the fact that the light is reflecting completely off to an angle and not into your viewing range, you would not see any reflection on that mirror. Now repeating this process with a diffused light source, light would be reflected in a way that would enable you to see any images reflected in that mirrored surface.
This means that in practice, sphere instruments are potentially more versatile and more applicable to color measurement of coatings since they allow for the measurement of a color with or without the impact of its substrate’s associated surface effects.
Optical Brightening Agents
Another consideration in choosing the right spectrophotometer for measuring color in coatings is whether optical brightening agents (OBAs) have been used in the formulation of these materials. OBAs operate through the process of fluorescence. They absorb invisible ultraviolet (UV) radiation at wavelengths below 400 nanometers (nm) and, through an electro-physical change, emit light mostly in the blue end of the visible spectrum at about 400 to 450 nm. When this light is emitted from coatings using brightening agents, color is perceived as “whiter than white,” since the observed light from the coatings will be the total of the reflected and emitted (due to fluorescence) light when illuminated by a source containing a large UV component.
Instruments that offer calibrated UV illumination enable long-term, consistent measurement of optically bright samples, including a variety of UV cutoff filters for the greatest flexibility.
Making the Right Choice
The bottom line is that regardless of your color measurement needs or the types of surfaces or materials you will be measuring, there is a spectrophotometer solution available that will ensure the utmost in color measurement accuracy throughout the color supply chain. This allows color measurement “by the numbers” and ensures that the needs and expectations of all stakeholders will be met.
For more information, visit www.xrite.com.
Looking for a reprint of this article?
From high-res PDFs to custom plaques, order your copy today!


